| |
|
|
| |
At one of our Club meetings, I saw
a 1/32 scale Porsche 917 model kit made by Matchbox that a couple
of the club members were looking at. I knew Matchbox made models,
but not of cars, and not in our favourite scale. Upon talking to them,
they advised that these were not made anymore, but that they had some
I could purchase.
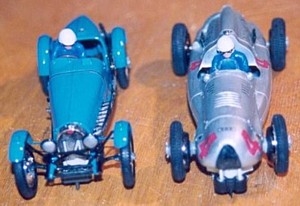 At
our next meeting I
acquired an Auto Union D type, and a Bugatti 59. At
our next meeting I
acquired an Auto Union D type, and a Bugatti 59.
In the NSCC magazine earlier in the
year, there was an article regarding conversions where the author
stated that conversions were quite often a case of making it up as
you go along, and this has certainly been my approach over the years,
and I know this holds true for some of the other Club Members as well.
 So
the boxes were opened and I stared at the contents for a week or so.
Due to the small width of the models, it was clear that I couldn’t
use a donor chassis, which also meant that I had to find some way
of holding the back axles in the correct position for the motors.
On the drive to the NSCC Bishops Stortford Swap meet, I discussed
this with one of the Club Members and his thoughts on the subject
confirmed mine on attaching axle holders onto the motor sides in the
style of the old 1960’s Formula Juniors. A couple of square sided
motors were purchased, similar to those used in the Fiestas and Turtle
Skateboards.Now came the thoughts
on the chassis. I took all the main body parts of the models and sellotaped
them into position. This greatly improved my visionary skills, in
understanding how the conversion was to be performed, and whilst sitting
in the garden, I found myself staring at the PVC cladding on the underside
of my house roof. So
the boxes were opened and I stared at the contents for a week or so.
Due to the small width of the models, it was clear that I couldn’t
use a donor chassis, which also meant that I had to find some way
of holding the back axles in the correct position for the motors.
On the drive to the NSCC Bishops Stortford Swap meet, I discussed
this with one of the Club Members and his thoughts on the subject
confirmed mine on attaching axle holders onto the motor sides in the
style of the old 1960’s Formula Juniors. A couple of square sided
motors were purchased, similar to those used in the Fiestas and Turtle
Skateboards.Now came the thoughts
on the chassis. I took all the main body parts of the models and sellotaped
them into position. This greatly improved my visionary skills, in
understanding how the conversion was to be performed, and whilst sitting
in the garden, I found myself staring at the PVC cladding on the underside
of my house roof.
|
|
| |
Later
down the pub I mentioned to a friend who installs windows and cladding
that I needed an off cut about six inches square. The following
morning a six foot plank was left propped up in my front garden.
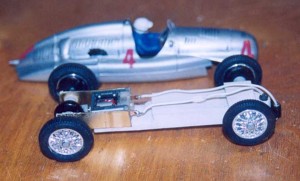
I had decided to
start with the Auto Union as this seemed the easiest, and cut off
a small section of the PVC that was as wide as the motor. After
reducing the thickness at one end I then glued the motor on.
From some scrap brass
fixings that had come with a curtain pole set, I fashioned two axle
holders, and drilled through for the axle to run, but purposely
drilled the hole bigger than required, so that the axle didn’t catch.
I then took a couple of standard axle bearings, and glued these
over the hole. This ensures that the axle is held in the right place
without any flexibility. The axle holders were then glued to the
sides of the motor.
 I
could now tell where the back axle would be, and so it was a case
of working forward to decide where the front wheels and guide would
fit. A drill hole was placed for the guide, and then the area around
was shaped to allow the guide to turn. I would point out here that
I scrapped the first two chassis, even though the PVC was very easy
to work. I
could now tell where the back axle would be, and so it was a case
of working forward to decide where the front wheels and guide would
fit. A drill hole was placed for the guide, and then the area around
was shaped to allow the guide to turn. I would point out here that
I scrapped the first two chassis, even though the PVC was very easy
to work.
I then glued the main body parts
of the model together. Knowing that I was going to remove most of
the floor plan, I identified from the model plans any parts that
would provide internal strength across the width of the model (such
as the dash board) and that wouldn’t interfere with the chassis,
and added these.
The Model had holes
through which the fixings for the wheels would fit, and so I knew
the alignment, and the height for the wheels would be correct. I placed
the chassis against the floor of the model, and drew around it and
cut out the unwanted floor, and cut slots up from the floor pan to
the holes through which the axles would fit. Then it was a case of
gradually filing away the edges until the chassis fitted.
|
|
| |
 The
tool I used most on the conversion was a one of the rotary, multi function
hobby tools. To cut out the floor pan, I used a circular mini saw blade
that was brilliant. For the filing down, I have various shaped attachments,
and just used whichever shape best fitted the area I was working on.
These tools can also be used as drills, and I have found so many uses
for it on the cars, that I wouldn’t now be without it. These are now
becoming cheaper each year, and although the attachments are not generally
interchangeable between makes, you can "adapt" attachments to fit with
some thought. One point though, is when filing, use a lower speed, as
otherwise the plastic on the car melts rather than files. The
tool I used most on the conversion was a one of the rotary, multi function
hobby tools. To cut out the floor pan, I used a circular mini saw blade
that was brilliant. For the filing down, I have various shaped attachments,
and just used whichever shape best fitted the area I was working on.
These tools can also be used as drills, and I have found so many uses
for it on the cars, that I wouldn’t now be without it. These are now
becoming cheaper each year, and although the attachments are not generally
interchangeable between makes, you can "adapt" attachments to fit with
some thought. One point though, is when filing, use a lower speed, as
otherwise the plastic on the car melts rather than files.
Back to the model. To hold the chassis
in, I just used one screw attached to a body post, and allowed the
axle holders to lean against a small amount of Milliput placed at
the inside top of the rear wheel arches. For body posts I use raw
plug strips, which come in lengths of about a foot, and in different
colours to indicate different screw sizes. The white ones fit our
screw sizes.
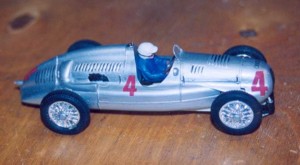
The body of the model
was now painted, and I added some of the exterior details from the kit,
and a Cartrix driver figure. For the wheels, I used the ones supplied
with the kit, as these had rubber tyres. The wheel width was increased
using Milliput, otherwise there was very little for the axles to hold
onto.
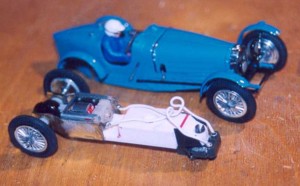
For the Bugatti, I followed
a similar approach, with a couple of exceptions. The axle holders had
to be bent inwards, and then bent back outwards parallel to the motor,
due to the small width at the rear of the model.
|
|
| |
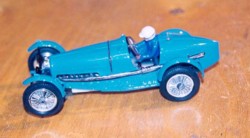 The
main issue was that the Bugatti’s front wheels hung from underneath
the model rather than came out of the bodywork. This meant that I
couldn’t utilise a normal front axle, the guide had to be placed behind
the wheels, and I had to ensure that the front wheels did not touch
the track, as the model fixings would not stand up to the strain of
running. The
main issue was that the Bugatti’s front wheels hung from underneath
the model rather than came out of the bodywork. This meant that I
couldn’t utilise a normal front axle, the guide had to be placed behind
the wheels, and I had to ensure that the front wheels did not touch
the track, as the model fixings would not stand up to the strain of
running.
Just to show that things don’t always
work correctly, and proving that it is not always best to make it
up as you go along, I carefully cut away at the underside of the Bugatti’s
front radiator grill so that the guide blade could turn, only to find
that I hadn’t left any room for the wires. I ended up cutting more
away, which has spoilt the front of the car. I should have fitted
the guide behind rather than under the grill.
A week after finishing these, I
visited our local model shop, and saw brass strips that they sold.
I think in hindsight, that I should have produced brass chassis, however,
my next plan is to create a PVC chassis for one of my Modifieds, to
see if there is any benefit, or future in the rest of the five and
a half foot plank.
|
|
| |
So there we are, these are never going
to break any club lap records, but it’s two more cars for the collection.
|
|
| |
|
|
